Have you ever tried improving your trail braking, or worked at rotating your car more entering a corner—and felt like you were doing it better—only to find out that your lap times have actually gotten slower?
If so, you’re not alone.
The list of drivers who have told me that as they practiced trail braking more, it resulted in slower lap times, is long. Sure, the trail braking did help them to get their car rotated, but at a lower speed.
But why?
Obviously, in the process of trail braking longer (to help rotate the car), you’re hanging on the brakes. And that, (even more Captain Obvious ahead!) slows you down more. Yes, you may have rotated the car more, but now your minimum speed is slower.
I was reminded of this when I was talking to a friend the other day. He told me that when he practices trail braking on his simulator, he finds that he over-slows for the corner, and that he also needs to move the BoB further into the corner. In other words, begin braking later. I agreed… but in a strategic way. Let’s take a look.
When many drivers deliberately practice trail braking more, they shift their EoB further into the corner—which is the right thing to do if you want to trail brake more. But, if you begin braking at the same place as before, and with the same pedal pressure, you’re only going to slow the car more by being on the brakes longer.
The solution? Ultimately, it’s beginning to brake later. To do that, you really need to think of braking as a zone, not a single point (BoB), or even two points (BoB and EoB).
Once you think of braking as a zone, then you can shift that entire zone further into the corner, and that results in you trail braking more—without over-slowing by spending more time on the brakes.
But, when I said “in a strategic way,” what I meant was not to do that all in one big step. As you’ll see the in the illustrations below, there’s an interim step that a driver should take. And if you’re the type (like me) who hates to wait, and tends to just dive right in and go directly the final step, stop. Take a breath, relax, and really, really, really take your time and go through the steps laid out below.
Before you even go there, though, we need to tidy up some thinking.
When driving on the road, as you approach an intersection or corner on the highway that you need to slow for, picture a “ghost line” on the road in front of you (like some simulator games/software do) indicating the entire brake zone. I suggest “seeing” that line as red (that means slowing to me).
The more you ingrain this way of thinking about managing your speed adjustment and weight/load transfer, the better you’ll get at adapting to the varying needs of the upcoming corner (and your car/tires).
Because a picture is worth a thousand words, and to help you with the mental model of how this works (the strategic steps), I created the following illustration of different brake pressure traces. I deliberately did not make them smooth so the actions are more obvious (but, please, please, please, make them smooth when you apply them to your driving).
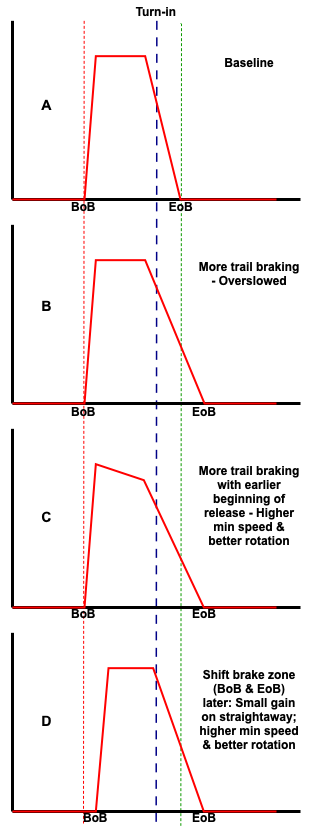
Getting to D may be the ultimate goal, but if you skip C you’re likely to have problems.
Please let me know if you have any questions or comments (click on the Comments button below).